


Introduction to map Tag in HTML
HTML has strong support for making websites more interactive. HTML allows intuitive designing with minimal coding. When we want to make the images more interactive, HTML provides the feature of image mapping. Using image mapping, we can interact with the image and jump from one image to another in the same frame. This feature is useful when we want to achieve a feature like zoom-in on the image on the website. Images will have a clickable area on them; we can configure the URLs or other images to be redirected when the user clicks on to that area.
Syntax
<img src = ” “ usemap = “new-map” >
<map name = “new-map” >
. . . .
. . . .
</map>
The syntax of the map tag is shown in the above example. We have two tags, img and map. In the map tag, we have given its name as “new-map”. The img tag will have src, which will display the image and note that it has an attribute named usemap. We have passed the name of our map to this img tag by using a usemap attribute. In the blank area between the map tag, we will be defining the configuration for the area and its links over the image.
HTML provides the “map” tag to achieve the functionality of image mapping. This is a very simple tag and generally will be used with the “img” tag. The img tag will be used to define the main or first image to be displayed. Then the map tag will be used to define the areas and the links. These two tags, img and map, will be linked together by using the name parameter.
Attributes of map Tag in HTML
Following are the top 5 attributes of map Tag in HTML:
1. name
The map tag is mainly associated with the “name” attribute. The name attribute is used to give a name to that particular defined map. This name is then used in the img element so that they both can be linked together. With this name attribute map, the tag will contain another element <area> in between. The code will look as below.
Code:
<map name = “new-map” >
. . . .
<area shape = “ ” coords = “ ” href = “ “ alt = “ “ >
. . . .
</map>
The area element defines the clickable area in the image. Generally, one map tag will contain more than one <area> element. The area element then will have attributes such as shape, cords, href, etc., which are useful while defining the image map. We can define the area and related images by using these attributes. The area element is normally used with a map tag and is always nested inside the map tag. The area element has the following attributes, which are important and useful while defining an image map.
2. shape
This attribute is used to specify the shape of the clickable area on the image. We have a total of four values that are associated with the shape that can be used.
- default: will define the entire region
- circle: specifies the circular shape
- rect: specifies the rectangular shape
- poly: specifies the polygonal shape
3. coords
This attribute is used along with the shape attribute to specify where that area will be located on the image. The values of this attribute will change depending upon the specified shape.
4. href
This attribute is used the URL to which the URL will be redirected. Upon clicking in the particular area only, which is defined by coordinates, the URL will be redirected.
5. alt
This attribute is used to specify the alternative text to be displayed if an image is not available. There are more attributes that are related to the area tag, but these are the basic attributes required to understand using a map tag.
Examples to Implement map Tag in HTML
Here are the examples of the map tag in HTML explained in detail.
Example #1
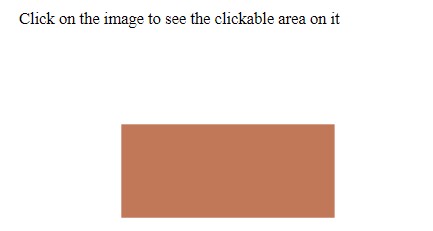
Let’s see the simple example of a Rectangle using image mapping.
Code:
<!DOCTYPE html>
<html>
<head>
<title> Image map Example </title>
</head>
<body>
<p> Click on the image to see the clickable area on it </p>
<img src = "rectangle.png" alt = "Rectangle Shape" usemap = "#new-map" >
<map name = "new-map" >
<area shape = "rect" coords = "91,70,290,160" alt = "Rectangle" href = "#" >
</map>
</body>
</html>
Output:
If we click on the rectangle area, it will show us the clickable area border as below,
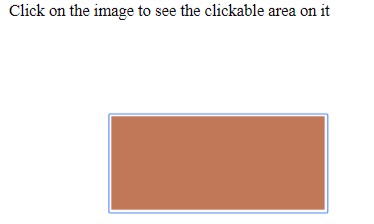
Please note that the URL will not be redirected as of now as we have not provided a valid URL in the href attribute.
Example #2
Let’s try the same example with Circle.
Code:
<!DOCTYPE html>
<html>
<head>
<title> Image map Example </title>
</head>
<body>
<p> Click on the image to see the clickable area on it </p>
<img src = "circle.png" alt = "Circle Shape" usemap = "#new-map" >
<map name = "new-map" >
<area shape = "circle" coords = "111,87,62" alt = "Circle" href = "#" >
</map>
</body>
</html>
Output:

While clicking on the image:
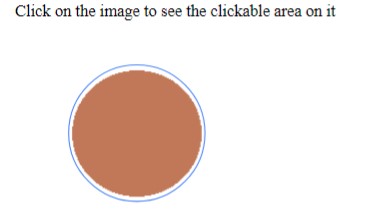
Note that the type of shape has been changed to a circle, and the values of coordinates are provided accordingly.
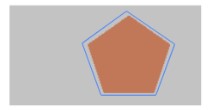
Example #3
Let’s design the example with a polygon as a subpart of another image.
Code:
<!DOCTYPE html>
<html>
<head>
<title> Image map Example </title>
</head>
<body>
<p> Click on the image to see the clickable area on it </p>
<img src = "polygon.png" alt = "Polygon Shape" usemap = "#new-map" >
<map name = "new-map" >
<area shape = "poly" coords = "166,45,217,80,197,134,139,134,119,79" alt = "Polygon" href = "#" >
</map>
</body>
</html>
Output:
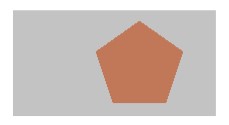
So, we have subparts as pentagon over an original image as a rectangle. Note that we can achieve any type of clickable area by adjusting the coordinate values.
Clickable Area:
Conclusion
So, we have seen what map tag is and how it is used. map tag is used for client-side image mapping. We can define a particular area of the image as clickable by means of using the map tag. We can achieve any shape by providing valid coordinates as required.
Recommended Articles
This is a guide to map Tag in HTML. Here we discuss the syntax, attributes, and various examples to implement the map tag in html. You may also look at the following articles to learn more –
.png)


2 Comments
please comment all of you and this article is good
ReplyDeleteGood
ReplyDelete