


Introduction to HTML Form Attribute
HTML provides very strong support to build web forms using built-in elements. Web forms are often the most used functionality at the client-side or user end. The HTML provides <form> element, which is mainly used to design the forms. It’s the main or parent element from which the overall form will be designed. Then various attributes are available to design the form as a whole document. In this HTML Form Attribute article, we will design a simple form and see the <form> element along with various attributes that we can use with it.
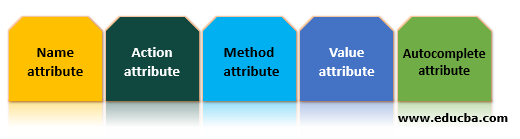
HTML Form Attributes
HTML form element can be used in various ways, It can be used along with the many existing available HTML elements like <button>, <input>, <fieldset>, <select>, etc. Also, there are various attributes available to use along with the <form> element. Let’s see them by designing the simple web form step by step.
1. name attribute
Code:
<!DOCTYPE html>
<html>
<head>
</head>
<body>
<div>
<form >
First Name: <input type = "text" name = "name" >
</form>
</div>
</body>
</html>
Output:
![]()
So we have a simple form with simple input as the First Name. The name attribute is used along with the form <input> element to declare input as the First Name. This attribute will be useful when we will send the form data over the network using HTTP. The attribute name and its value will be added to the HTTP Request when we send the request. This information will be used for processing data at the server-side.
2. action attribute
Let’s add the submit button in our example so that the form can be submitted.
Code:
<div >
<form >
First Name: <input type = "text" name = "name" >
<input type = "submit" >
</form>
</div>
Output:
![]()
If we try to submit the form by clicking on the submit button, it will not work. If we look at the code, there is no action to perform or do something upon submitting the form. This is where the <action> attribute comes into the picture. Let’s add the <action> element in our example along with some additional input fields.
Code:
<div >
<form action="action.html" >
<label> First Name: </label> <br>
<input type = "text" name = "fname" > <br> <br>
<label> Last Name: </label> <br>
<input type = "text" name = "lname" > <br> <br>
<label> Email: </label> <br>
<input type = "text" name = "email" > <br> <br>
<input type = "submit" >
</form>
</div>
Output:
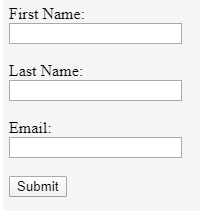
So we have added two more input elements, last name and email, so that we can see how the form data is sent within the URL when we submit the form. Also, in the form element, we have added the <action> attribute with the value as “action.html”. So, whenever we submit the form, the URL will be redirected to the web page or resource under the action attribute, and along with that, the form data will be submitted
If you try to submit the form as it is, you will get an error like a file not found, but that’s OK as the processing of data is not in our scope to learn right now. But If you see the redirected URL, you can see the submitted fields along with the values because the get method is being used by default for form submission.
3. method attribute
So HTTP requests can be made using various methods like get, post, put, delete, etc. method attribute is used to specify the method used for the submission of a form. In the previous example, we have sent the request with the default get method. We can specify a particular method using a method attribute.
Example
<form action="action.html" method="post" >
Just modify the form element as above in our example. Now request will be made as a post request, and we will not be able to see the fields and their values.
4. value attribute
The value attribute is used on the fields to set their initial value in the form. When the form is loaded, the assigned values will be displayed as default on the user page which the user can change.
Let us add value attribute in our example:
Code:
<div >
<form action="action.html" method="post" >
<label> First Name: </label> <br>
<input type = "text" name = "fname" value="Enter first name" > <br> <br>
<label> Last Name: </label> <br>
<input type = "text" name = "lname" value="Enter last name" > <br> <br>
<label> Email: </label> <br>
<input type = "text" name = "email" value="Enter valid email" > <br> <br>
<input type = "submit" >
</form>
</div>
Output:

5. autocomplete attribute
The HTML autocomplete attribute is used along with the form element to enable or disable the autocomplete feature. This feature is available as ON by default; that’s why we can see the autocomplete suggestion in our previous example. We can add this attribute in the form element as below,
Code:
<div >
<form action="action.html" method="post" autocomplete="off" >
<label> First Name: </label> <br>
<input type = "text" name = "fname" > <br> <br>
<label> Last Name: </label> <br>
<input type = "text" name = "lname" > <br> <br>
<label> Email: </label> <br>
<input type = "text" name = "email" > <br> <br>
<input type = "submit" >
</form>
</div>
Output:

The suggestions will not be shown when autocomplete is off, and by default, it will be on.
Conclusion
So we have seen most of the available and important HTML form attributes that we can use while building the web forms. We have seen form attributes such as action, method, autocomplete, etc. These HTML form attributes make it easy to implement various kinds of features to develop and design intuitive web forms. They allow flexibility so that forms can be designed in a required way. The web forms can be designed in various possible ways, and HTML form elements are their backbone.
Recommended Articles
This has been a guide to HTML Form Attribute. Here we discuss the basic concept and different HTML Form Attribute with code implementation. You may also have a look at the following articles to learn more
.png)


3 Comments
LEARN YOU HTML ATTRIBUTE FORM
ReplyDeleteThis is useful information
ReplyDeleteThis is good 👍👍 article
ReplyDelete